How to Make a Bitcoin Mining Rig: A Step-by-Step Guide for Beginners
How to Make a Bitcoin Mining Rig: A Step-by-Step Guide for Beginners

How to Make a Bitcoin Mining Rig
The allure of generating Bitcoin is stronger than ever, and for many enthusiasts, building a mining rig is the ultimate way to engage with the cryptocurrency’s ecosystem. While the process may seem daunting, understanding how to make a bitcoin mining rig is a manageable project with the right guidance and components. This guide will walk you through the entire process, from sourcing parts to your first mining payout, ensuring you build a efficient and profitable operation.
At BT-Miners, we empower miners of all levels with both the hardware and the knowledge to succeed. Let’s demystify the process and build your first Bitcoin mining rig.
Understanding the Core: ASICs vs. GPU Rigs
First, a critical clarification. When discussing how to make a bitcoin mining rig for Bitcoin specifically, we are almost exclusively talking about ASIC (Application-Specific Integrated Circuit) miners. These are specialized machines designed solely for the SHA-256 algorithm that Bitcoin uses. They are vastly more powerful and efficient than GPU (Graphics Processing Unit) rigs for this specific task.
While GPU rigs are versatile and can mine various other cryptocurrencies, this guide will focus on building a setup with an ASIC miner, as it is the only commercially viable way to mine Bitcoin today.
Essential Components for Your ASIC Mining Rig
Building your rig is less about assembly and more about creating the right ecosystem for your ASIC to thrive. You will need:
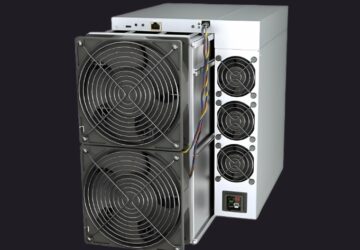
- The ASIC Miner: This is the heart of your operation. This is where your partnership with a reliable supplier like BT-Miners is crucial. We recommend starting with a balanced, efficient model like the Antminer S19 series or the Whatsminer M30s. The choice depends on your budget and electrical costs.
- Power Supply Unit (PSU): Most ASIC miners require a significant amount of power and often use a specialized PSU. Some models come with a built-in PSU, while for others, it is a separate unit. Ensure the PSU you choose or the one provided can deliver stable power at the required wattage and voltage.
- Stable Internet Connection: Mining is a continuous, internet-dependent process. A wired Ethernet connection is highly recommended over Wi-Fi for its stability and reliability, preventing costly disconnections.
- Cooling and Ventilation: ASIC miners generate a substantial amount of heat and noise. Proper cooling is non-negotiable. This can range from a well-ventilated room with strong fans to a more advanced dedicated exhaust system. An overheated miner will throttle its performance or fail prematurely.
- Mining Pool Credentials: Solo mining Bitcoin is virtually impossible for individuals due to the high network difficulty. You will need to join a mining pool, where participants combine their computational power to earn block rewards, which are then shared based on contributed work. Popular pools include Foundry USA, Antpool, and F2Pool.
The Step-by-Step Build Process
Now, let’s get into the practical steps of how to make a bitcoin mining rig.
Step 1: Choose and Acquire Your ASIC Miner
Your first and most important decision. Consider hash rate (e.g., 100 TH/s), power consumption (e.g., 3250W), and efficiency (J/TH). Use online profitability calculators, inputting your local electricity cost, to estimate your potential earnings. Once you’ve decided, source your miner from a trusted global supplier like BT-Miners to guarantee authenticity and warranty support.
Step 2: Set Up the Physical Environment
Find a suitable location for your miner. A cool, dry, and well-ventilated space like a basement or garage is ideal. The space must be able to handle the noise and heat output. Set up your ventilation—fans should be positioned to push hot air away from the miner and out of the room.
Step 3: Connect the Power
This step requires caution. Ensure your electrical circuit can handle the miner’s load. A 3200W miner, for example, requires a dedicated 240V outlet, similar to what a clothes dryer uses. Do not use standard 110V outlets for high-power miners, as this is a fire hazard. Connect the power supply to the miner and then plug the PSU into the wall outlet.
Step 4: Connect to the Network
Using an Ethernet cable, connect your ASIC miner directly to your internet router. This provides the most stable connection for submitting shares to the mining pool.
Step 5: Configure the Miner
Every ASIC miner has a built-in interface. You will need to find your miner’s local IP address, which can typically be found through your router’s admin panel. Enter this IP address into a web browser on a computer connected to the same network. This will bring up the miner’s configuration page.
Here, you will enter the details of your chosen mining pool:
- URL: The pool’s server address (e.g.,
stratum.antpool.com:3333). - Worker: Your assigned worker name for the pool.
- Password: Usually can be left as “x” or a password you set.
You will also set a username and password for the miner’s own web interface to secure it from unauthorized access.
Step 6: Start Mining and Monitor
Save your settings, and the miner will begin its boot-up sequence. After a few minutes, it should be hashing away at full speed. You can monitor its status—including hash rate, temperature, and any hardware errors—from the web interface. Your chosen mining pool’s website will also show your worker’s status and your accumulating rewards.
Why Your Source for Hardware is Your Key to Success
Understanding how to make a bitcoin mining rig is only half the battle. The quality and reliability of your core component—the ASIC miner—will determine your long-term profitability and peace of mind. This is the foundation of the BT-Miners promise.
When you build your rig with us, you gain a partner dedicated to your success:
- Guaranteed Authenticity: We source all our equipment directly from manufacturers, ensuring you receive a genuine, high-performance product, not a refurbished or faulty unit.
- Expert Support: Our team is composed of mining enthusiasts. We can help you choose the right miner for your specific goals and provide post-purchase support to get you started smoothly.
- Global Logistics: We ship worldwide, ensuring your components arrive quickly and safely, so you can start mining without unnecessary delays.
Conclusion: Your Mining Journey Begins Now
Building your first Bitcoin mining rig is an exciting and educational project. By following this guide on how to make a bitcoin mining rig, you are taking a significant step towards participating in the Bitcoin network directly. It combines technical knowledge with financial strategy, and the rewards extend beyond the Bitcoin you earn to a deeper understanding of the technology shaping our future.
The journey starts with reliable hardware. Your rig is the engine of your operation; make sure it’s built on a foundation of quality.
Ready to assemble your high-performance mining rig? Browse our curated selection of the world’s most efficient ASIC miners at BT-Miners and take the first step towards profitability today.
Start building at: https://bt-miners.com
For personalized hardware recommendations and support, contact our global team:
- Email: store@bt-miners.com
- United States: +1-813-820-0668
- United Kingdom: +44-333-015-6152
- Australia: +61-2-8074-3443
BT-Miners: Powering Your Digital Future.